How Can I Remove PhotoScape from My Computer (Solved)
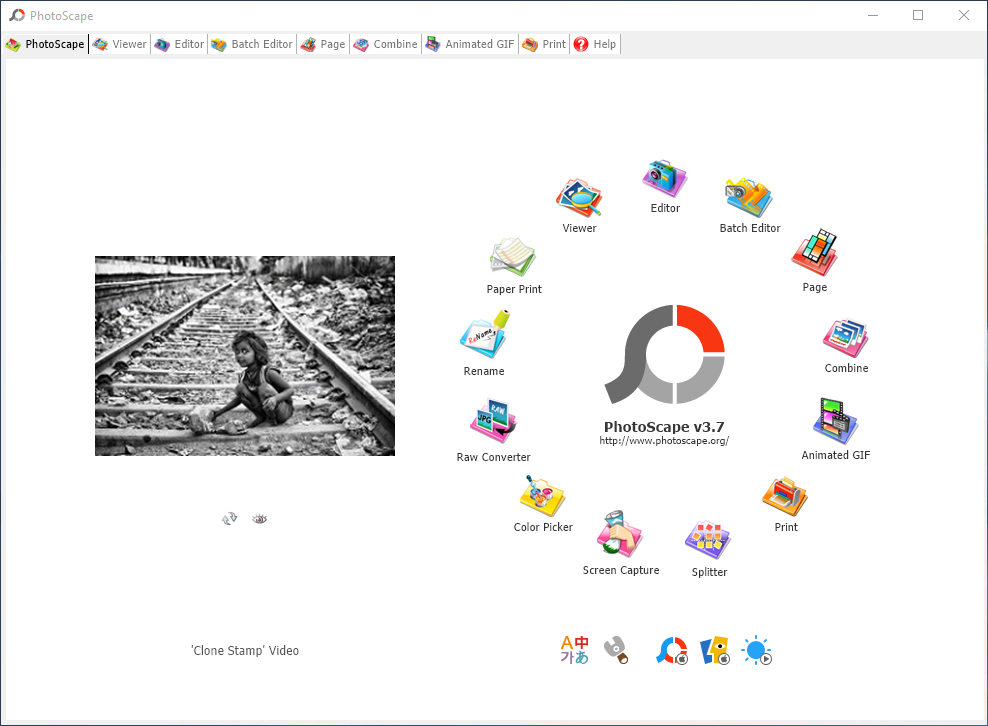
As a free image editor developed by MOOII Tech, PhotoScape can be used to not only resize, edit, and tweak your digital images but also create slideshows and animated GIFs, capture screenshots, combine and splits images, etc. This program has many extra functions to meet the demands of different users. But since you have come to this page, I guess you are looking for the proper way to uninstall PhotoScape.
As we notice, many users are stuck in troubles when trying to uninstall PhotoScape. Uninstalling PhotoScape may fail to complete due to various reasons. Not matter what issue you have encountered, read through this tutorial to get it solved effectively.

Generally speaking, once installed, a program will show up in the list of installed programs located in Windows Control Panel, and you can easily uninstall it through Windows built-in Add/Remove applet. Moreover, some programs has a dedicated uninstaller stored in the installation folder, and you can run the executive file to perform a normal uninstall. Now log on to your system with an administrative account first, and then follow the instructions to ensure a complete uninstall of PhotoScape.
Way 1: Uninstall PhotoScape via Windows Built-in applet
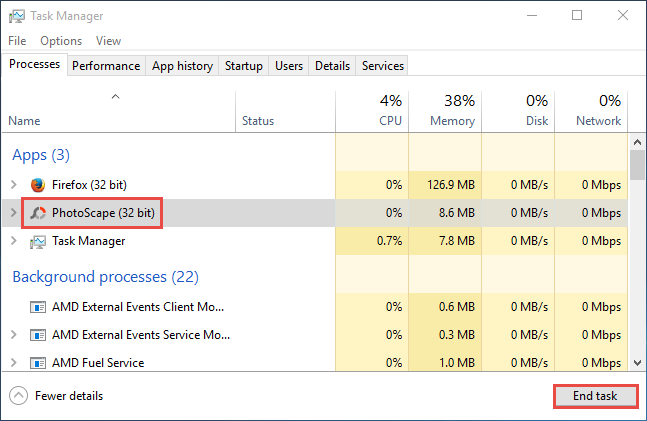
Before the uninstall, you had better make sure the program you wanna delete is not running on the background, or else error message may pop up and cause incomplete uninstall. If PhotoScape fails to exit, you can shut it down via Task Manager.
- Press Ctrl+Shift+Esc keys together to bring up Task Manager.
- Select the process(es) pertaining to PhotoScape and click End Task button.
Here are the detailed steps for different OS users to perform a normal uninstall:
For Windows 7 users:
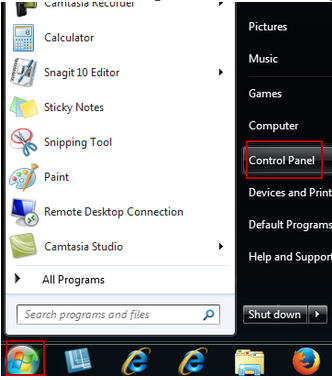
- Access to Start > Control Panel > Program to open Programs and Features panel.
- Scroll through to locate PhotoScape, highlight its icon and click Uninstall.
For Windows 8 users:
- Right click Start menu and then click Programs and Features from the list.
- Highlight PhotoScape and click Uninstall to begin the uninstallation.

For Windows 10 users:
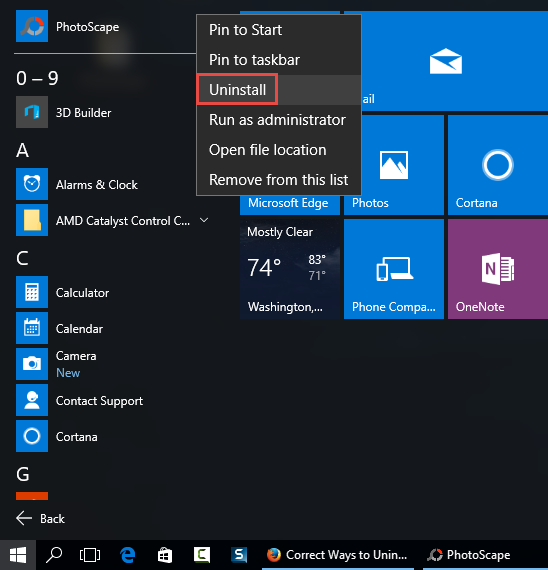
- Click Start menu, and click All apps to open the list of installed programs.
- Scroll down to find PhotoScape, right click on it, and choose Uninstall.
- Click Uninstall in the new opened window to activate default uninstaller.
- Windows 10 users can also type Uninstall in the search box, click Apps & features, and then click Uninstall option after selecting PhotoScape in the list of apps.
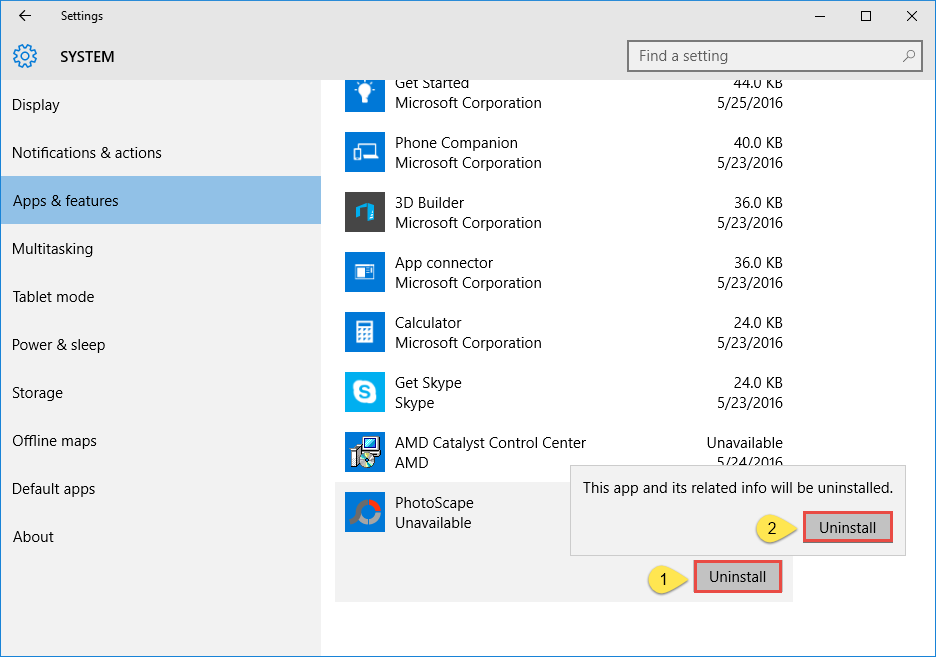
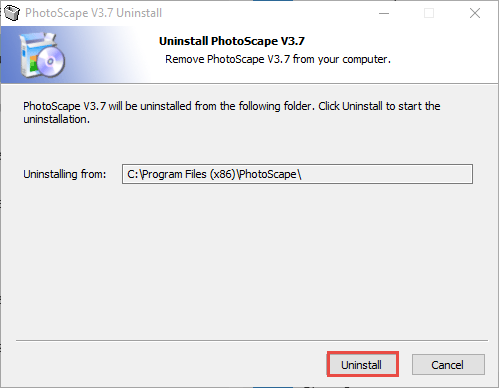
After that, the PhotoScape Uninstall window will pop up to ask for your confirmation. Once you click Uninstall button in the window, the uninstall request will be handled and it takes a few seconds to complete. Then you can click Close to exit the wizard.

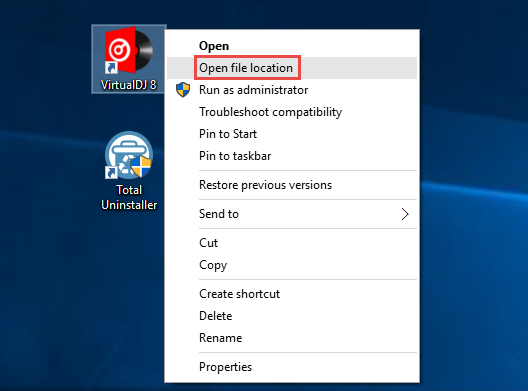
Way 2: Uninstall PhotoScape via Dedicated Uninstaller
Yeah, PhotoScape has a dedicated uninstaller which you can make use of. It is a simple process as well.You can navigate to the installation folder of PhotoScape (usually saved in C:/Program Files) and then launch the executive program to start the uninstall.
- Right click PhotoScape icon on the desktop, and choose Open file location.
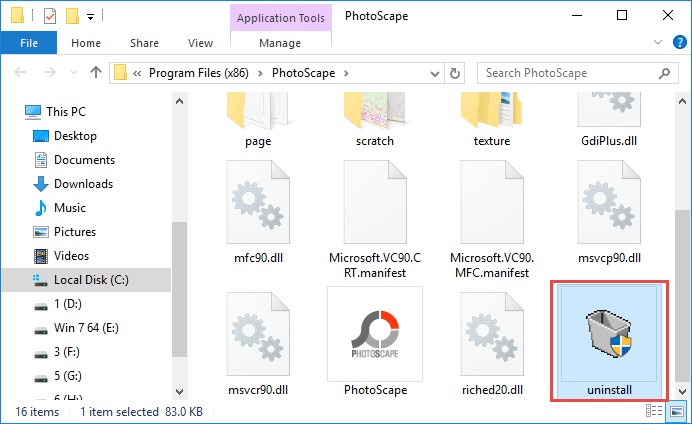
- Scroll through in the opened window to locate the file named uninstall.exe.
- Double click on this file, and then follow the prompts to complete the uninstall.
Tips: if the program is installed properly, you can uninstall it by the aforementioned methods. But if some of the executive files are damaged or deleted, standard ways may fail to work effectively, and issues appear like PhotoScape doesn’t show up in the Control Panel, or the uninstall process is stopped by unknown error. If that’s what you are faced with, try this solution: run PhotoScape package to cover corrupted/missing files and uninstall it in Safe Mode. Then how reboot system into Safe Mode?
- Press Windows + R keys together to access the Run option.
- Type "msconfig" in the Open: field and then hit enter key.
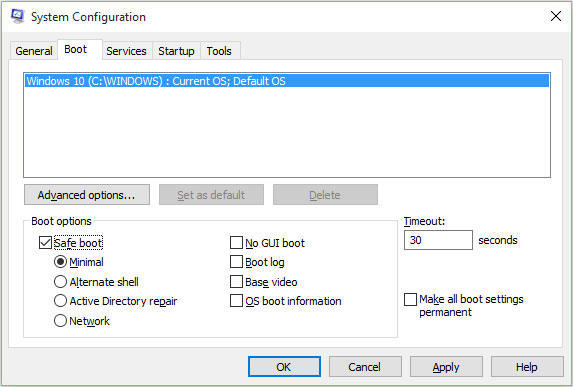
- Click on the Boot tab in the System Configuration window.
- Check the box for Safe boot and select the Minimal option.
- Click OK and then choose Restart option in the pop-up dialog.
Wait... How to Manually Remove PhotoScape Residuals?
Though PhotoScape has been uninstalled, it may leave junk files and folders around your system. You should perform a scan on your computer and then clean them out.
(1) Delete entries in Windows Registry
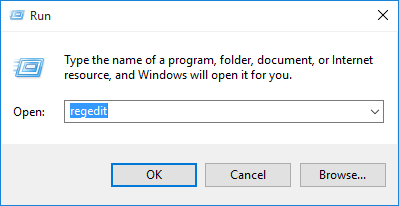
- Go to Start > Run, type "regedit" and hit Enter to launch Registry Editor.
- Click Yes if you are prompted to give confirmation in UAC dialog.
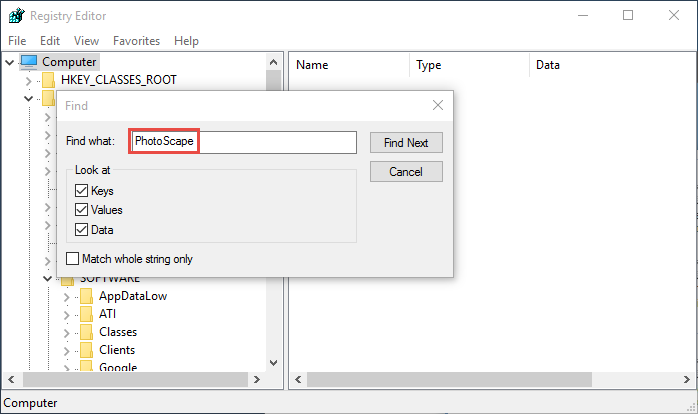
- Press Control + F together to open the Find box and then type PhotoScape.
- Hit Enter (and then F3) to locate the entries associated with PhotoScape.
- Right click on the keys or values and choose delete option in the list.
Notice: You must be very cautious when making changes on Windows Registry. Inexperienced users are not recommended to modify the registry without making a backup copy, cause serious issues may occur if you mistakenly delete keys or values there. If you are not confident in accomplish this part, we suggest you to utilize an professional uninstaller or a registry cleaner to get the job done automatically.
(2) Remove leftovers in Hard Drive
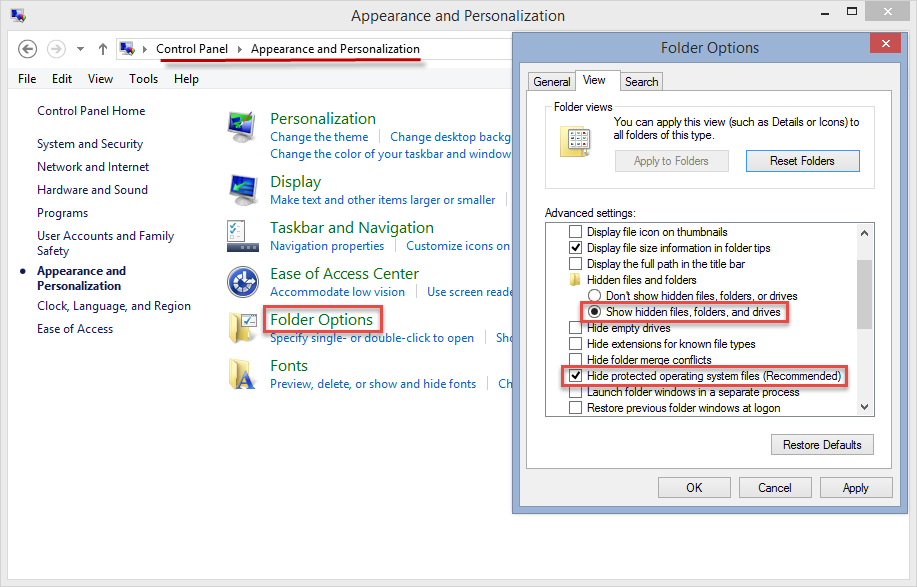
- Head to Start > Control Panel > Folder Options, and then select the View tab.
- Check the "Show hidden files and folders" in Advanced settings and click OK.
- Click This PC on the desktop(or press Windows + E ) to open File Explorer.
- Type PhotoScape in the Search Bar and wait a few seconds.
- Identify PhotoScape leftovers in the result and delete them permanently.

Congratulations! Now you should have fully remove PhotoScape from your computer. The aforementioned ways works for most Windows programs as long as you perform the steps correctly. Yet, if you wanna uninstall PhotoScape with minimal effort, we highly suggest you to adopt the most effective approach listed below.
Way 3: Automatically Remove PhotoScape within Clicks
(Strongly Recommended for All-Level Users)
Perhaps the conventional removal way is a little time-consuming and risk-taking for most ordinary users. Some of you may wonder if there is an all-in-one solution to handling any unwanted program removal without hassle? The answer is YES. Total Uninstaller is a handy utility facilitated with powerful uninstall engine. You will be satisfied with its intuitive interface, simplified process & perfect removal outcome.
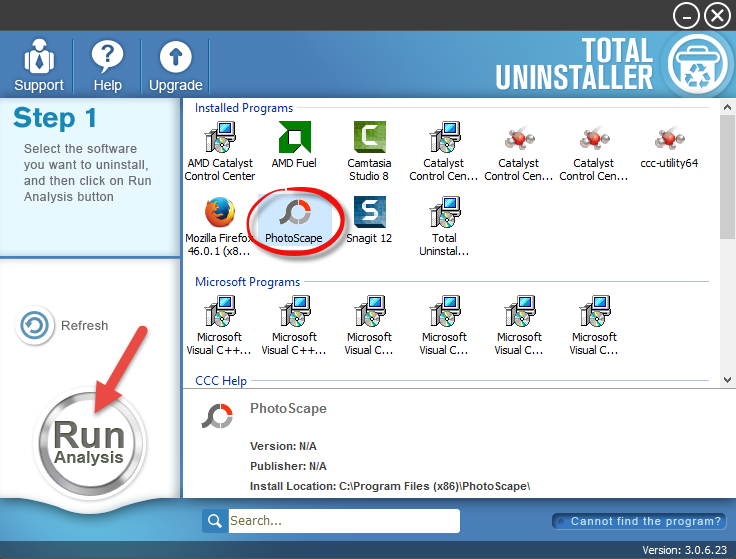
1. Launch Total Uninstaller, choose PhotoScape and click Run Analysis.
2. Click Complete Uninstall after all the components have been scanned out.
3. Click Yes in the pop-up dialog to confirm the uninstall of PhotoScape.
4. Follow the prompts in the PhotoScape wizard to finish the uninstall.
5. Click Scan Leftovers and then Delete Leftovers to perform complete removal.
6. Click Yes in the pop-up dialog and then OK to exit PhotoScape removal.
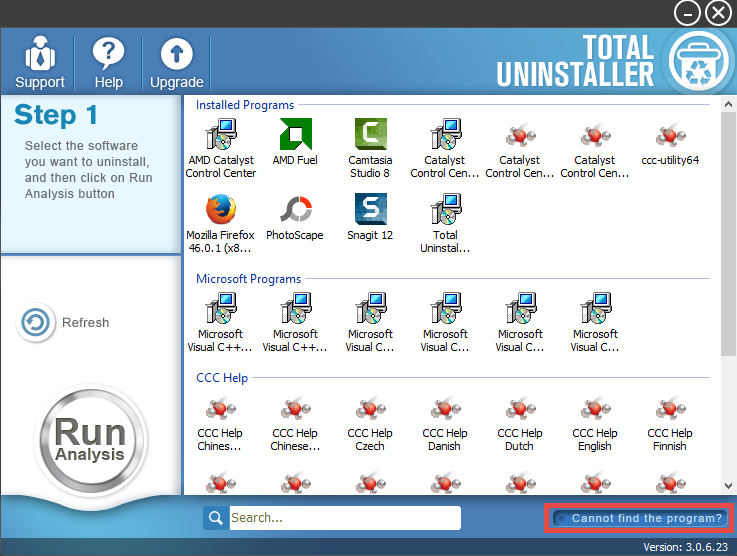
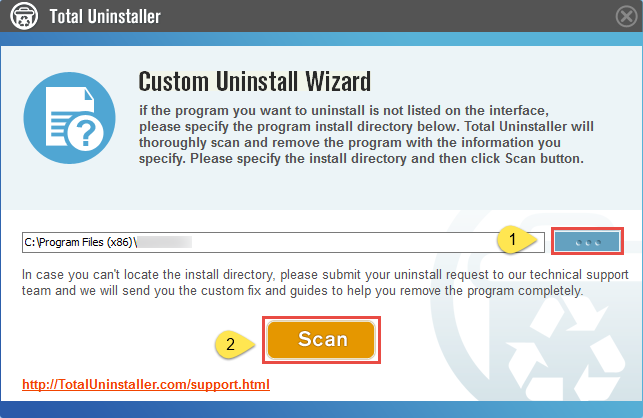
For the program that does not show up in the TU interface, you can perform a force uninstall to get rid of it. Force Uninstall Mode can be used to effectively remove those corrupted/problematic/malicious/stubborn programs. Just click “Cannot find the program” button in Step 1, specify the installation folder of target program in the pop-up window, and click Scan button to continue uninstallation with Step 3.
Summary: in this post we listed three uninstall methods to help you get rid of PhotoScape without leaving a trace. You can choose any of them to get problems solved. If you have any troubles in program removal, please leave your comment here, and our experts will be glad to offer you technical assistance if you wish to.